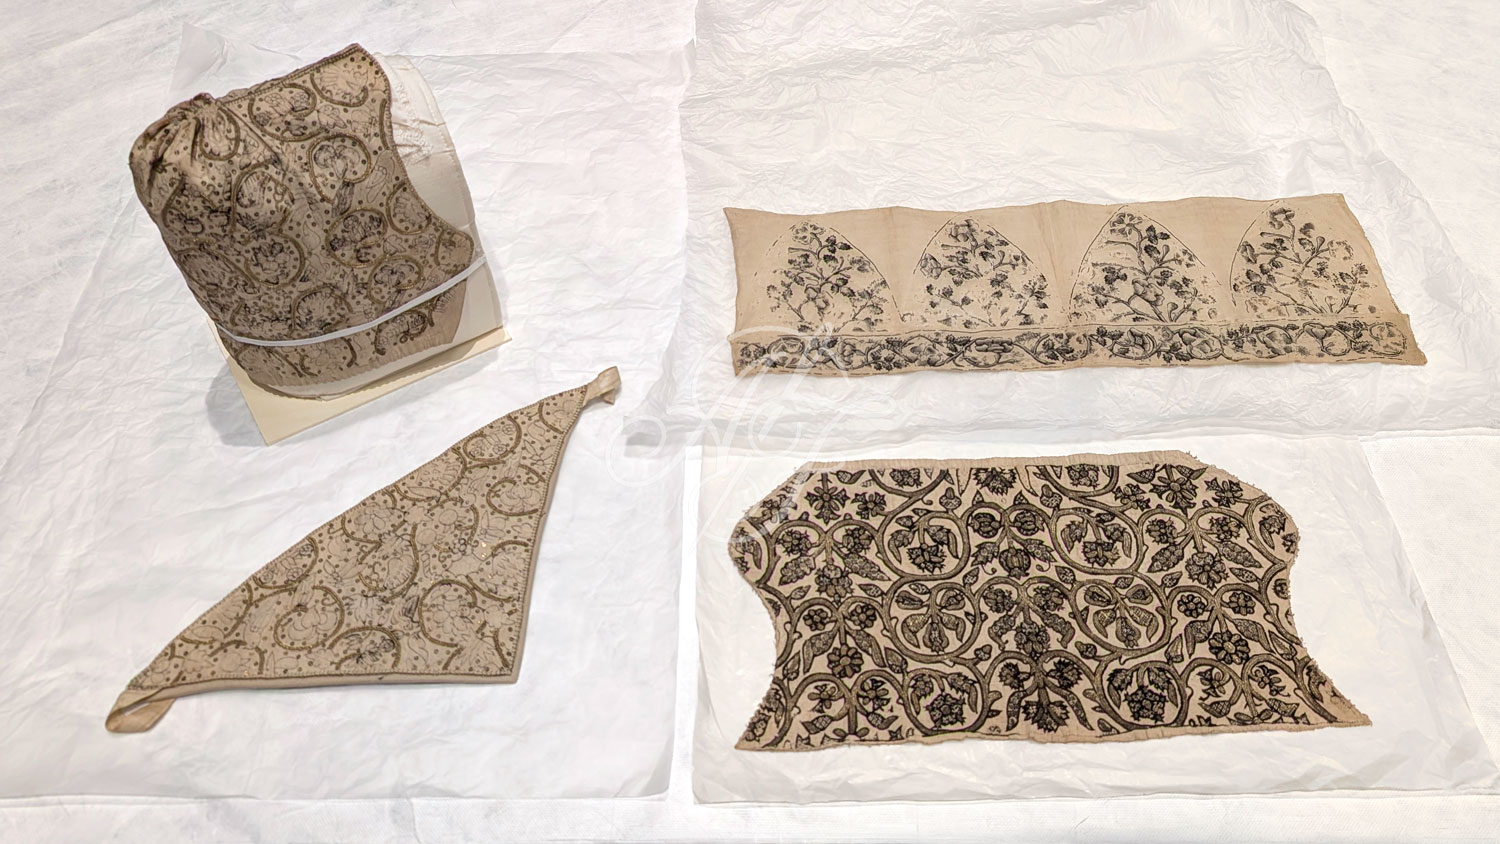
If you've already read my last blog post on crewelwork, you'll know how excited I was to discover the "Order an Object" service at the Victoria & Albert Museum! It's an online system for members of the public to view collection works up close and study them, often with the ability to move and manipulate the objects personally. You don't need to be a student, researcher, or industry professional to sign up, and you can choose your own timeslot on an easy-to-use digital registration system. I highly recommend trying it out - It was a lovely experience from start to finish.
For my first visit, I requested to view 5 objects, all relating to late 16th and early 17th century embroidery. This was intentionally planned to coincide with my work in progress Blackwork Coif, as I wanted to see some extant pieces of embroidery to guide my own research and stitching. I was particularly interested in blackwork, so I selected 3 (really 4) objects with blackwork embroidery dating from 1575 to 1625 to study.
Coif
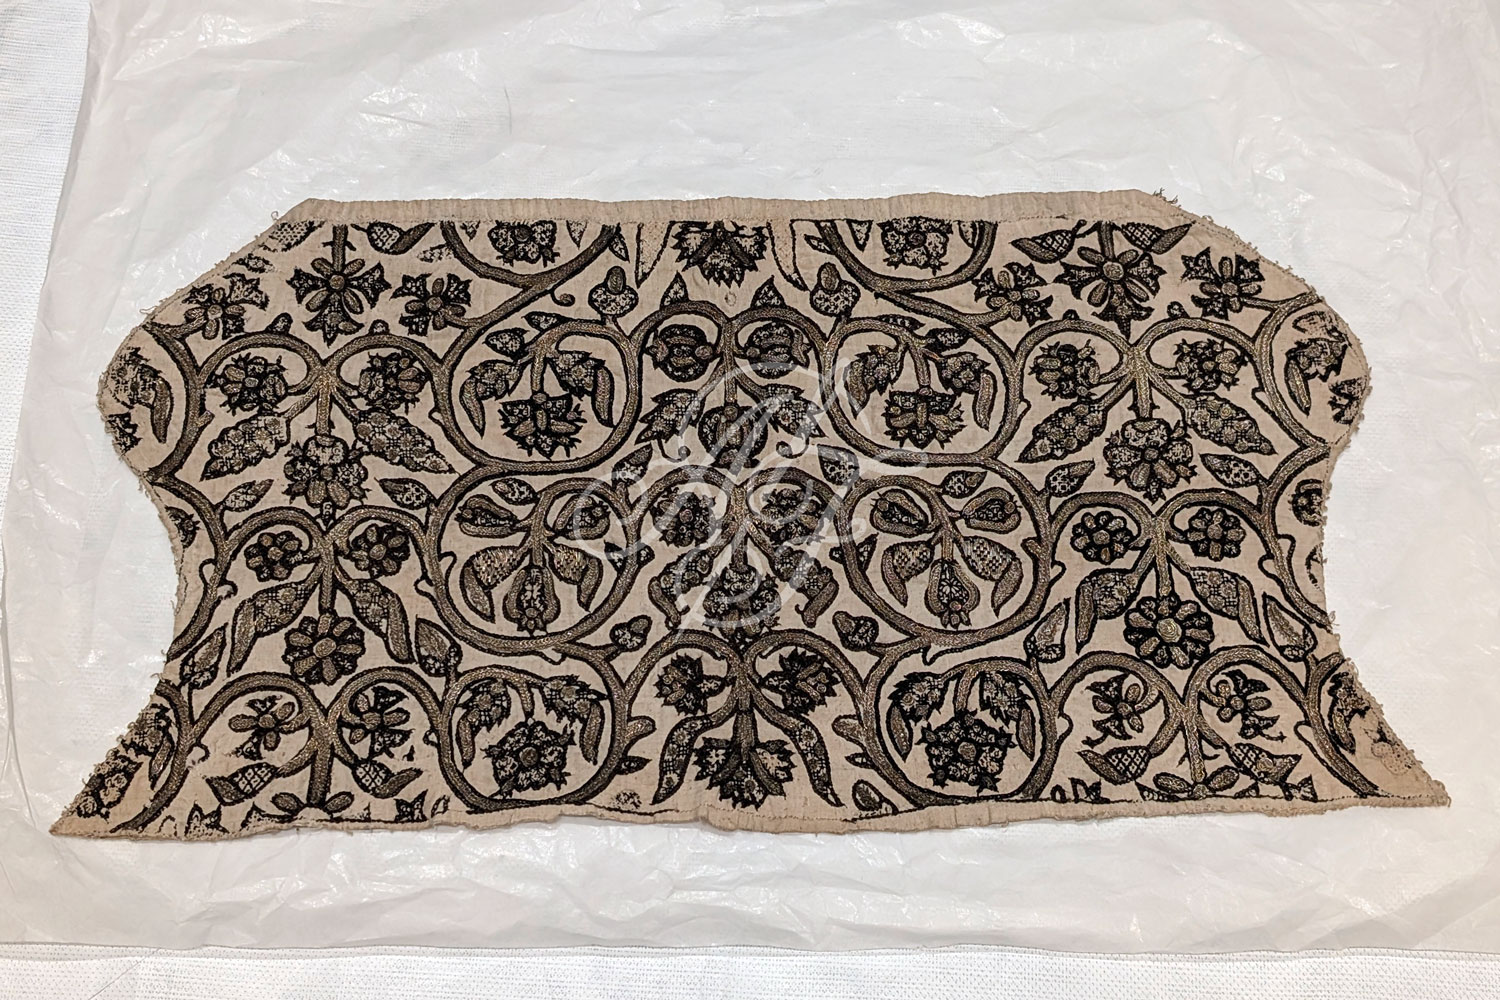
Details from the V&A Museum's records: accession number T.11-1948. This item is circa 1575-1599, making it the earliest example I've studied, and it's English in origin. From the V&A online listing: "The pattern consists of scrolling stems outlined in black and filled with silver-gilt, bearing roses, honeysuckle, pomegranate, carnation, pansies, acorns, and pears, worked in black and embellished with silver-gilt. The individual motifs are filled with repeating geometrical patterns worked in back stitch."
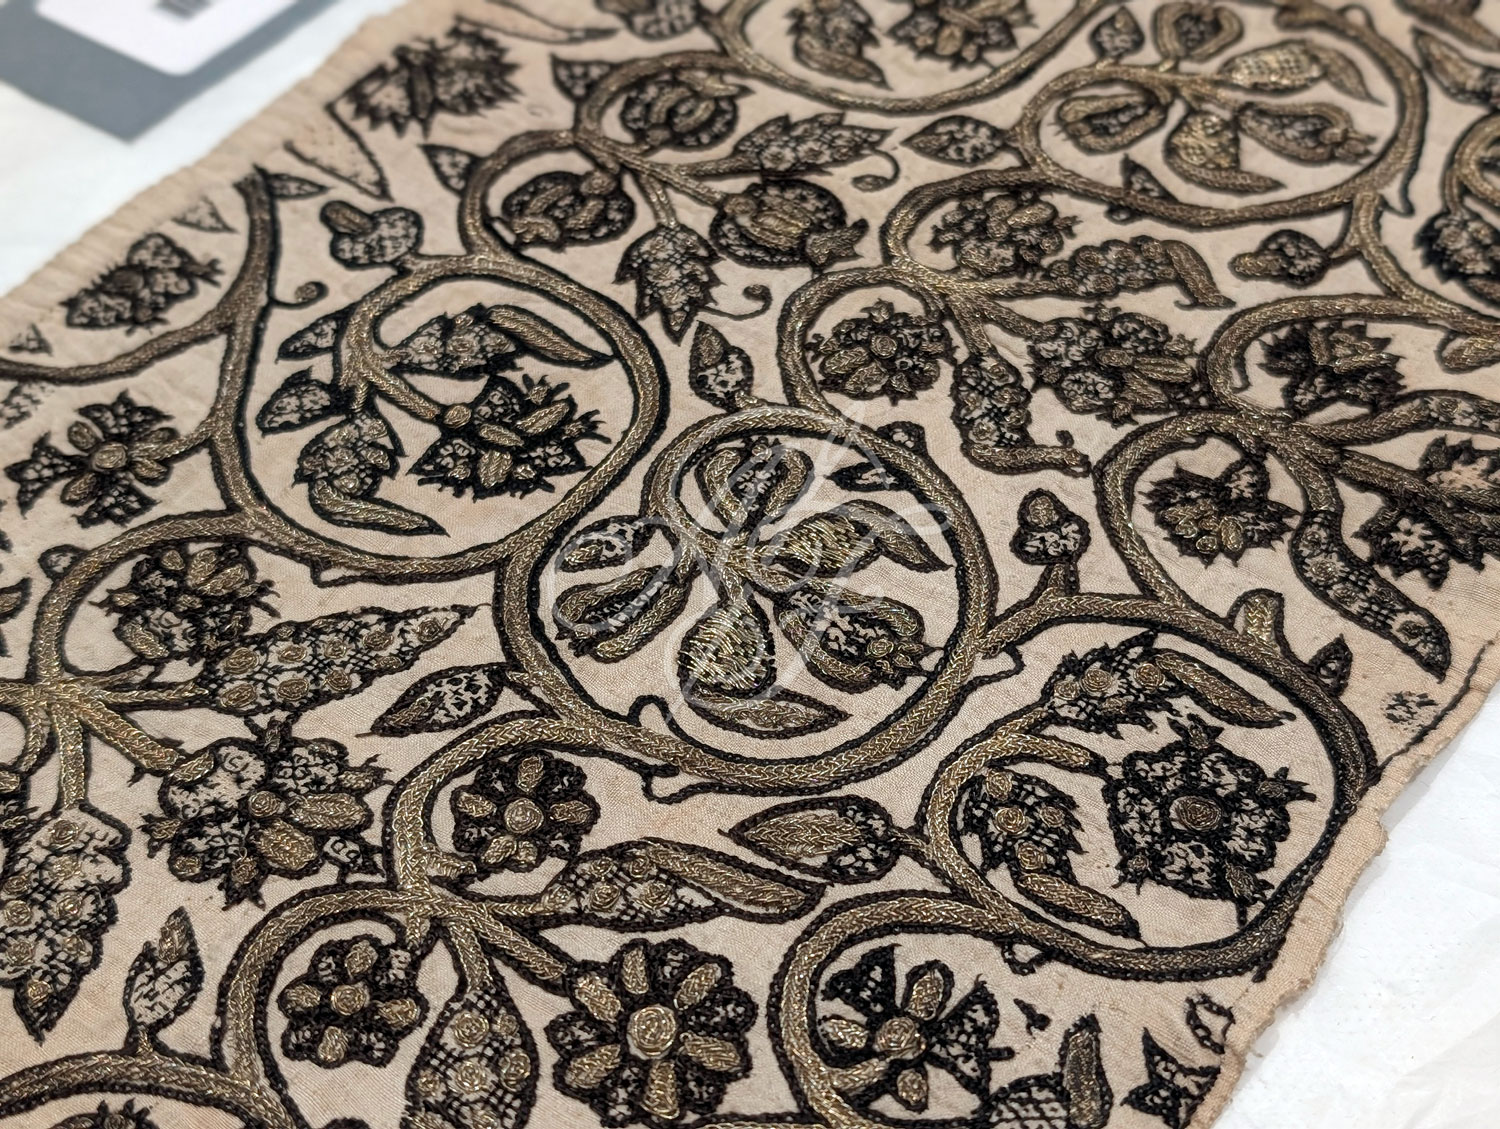
For first impressions, I immediately noted how incredibly lightweight it was to handle! (Yes, they do allow careful handling of the collection garments.) It feels like lifting nothing at all, despite the visual heaviness of the silver-gilt braids and amount of blackwork.
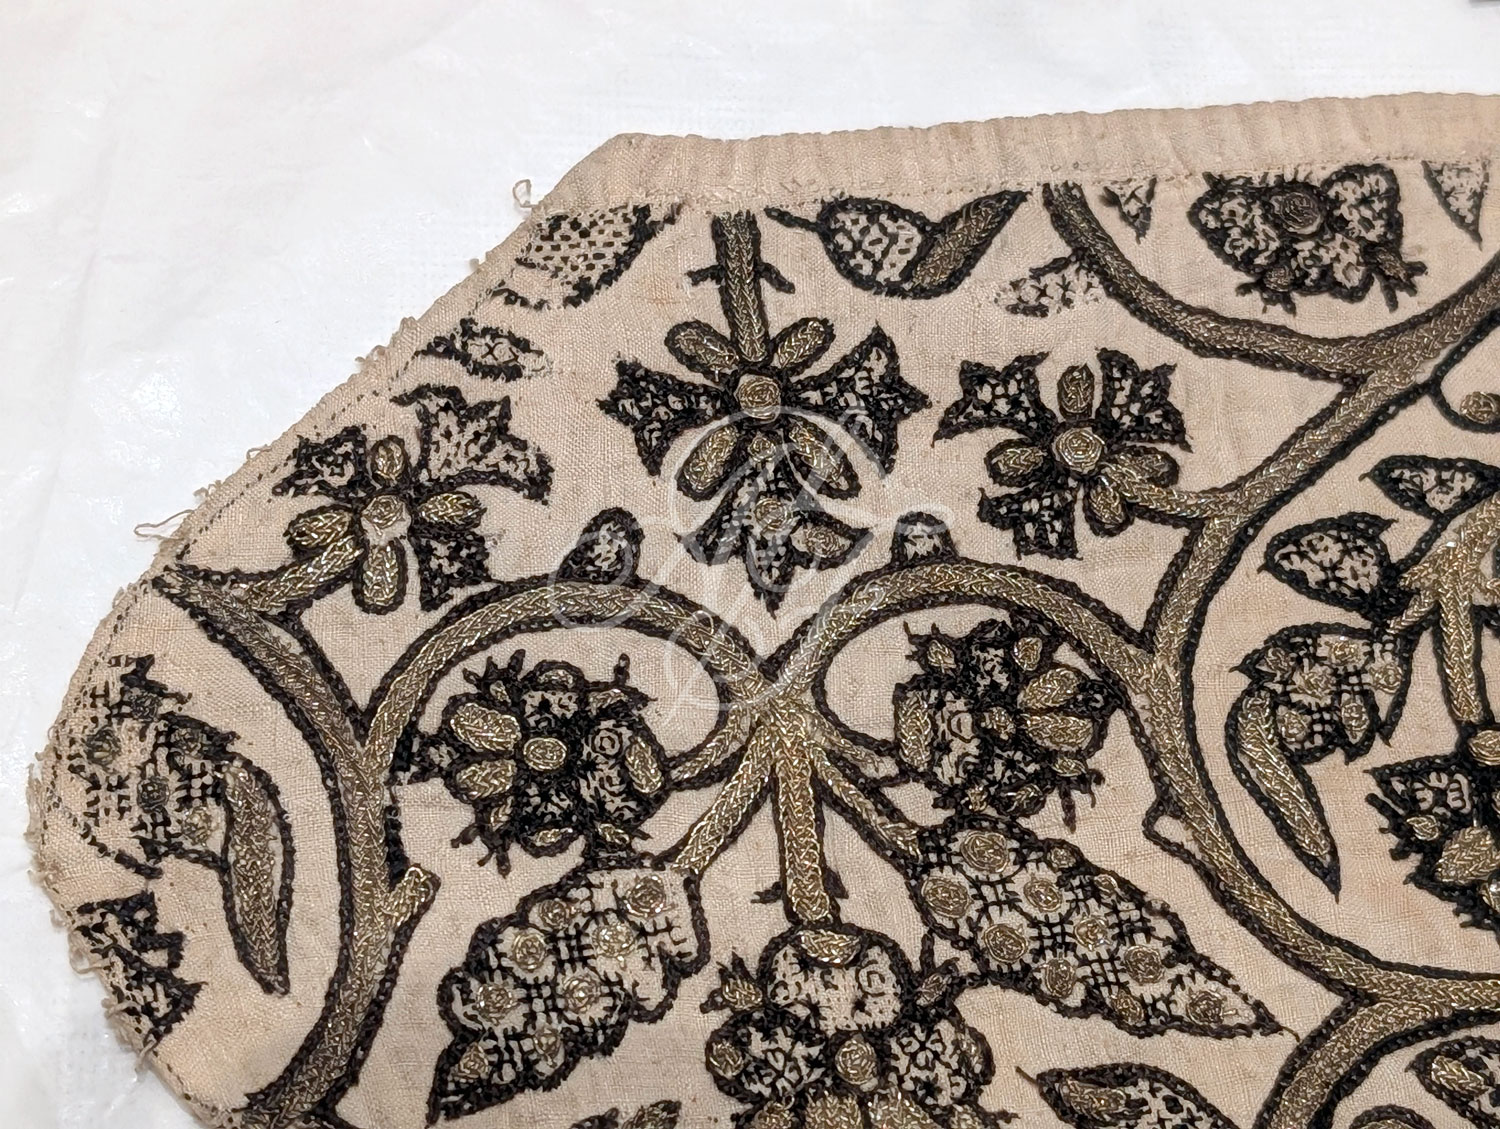
Onto construction details... The linen is approx 65 threads per inch (my eyesight is not fantastic on this tiny scale, so this is an estimate), and it's very tightly woven and evenly woven in both directions. It's also very thin, although not transparent, hence the light weight of the piece overall. The nape edge has a folded back edge, about 10-12mm (wider on one side than the other), whip stitched down with linen thread to make a casing for the tie. Remnants of linen thread remain along the face edge (likely where lace was previously attached) and the top seam edge that has been unpicked. The seam allowance along the front face edge is double turned under 4-6mm and roughly whipped down with linen thread.
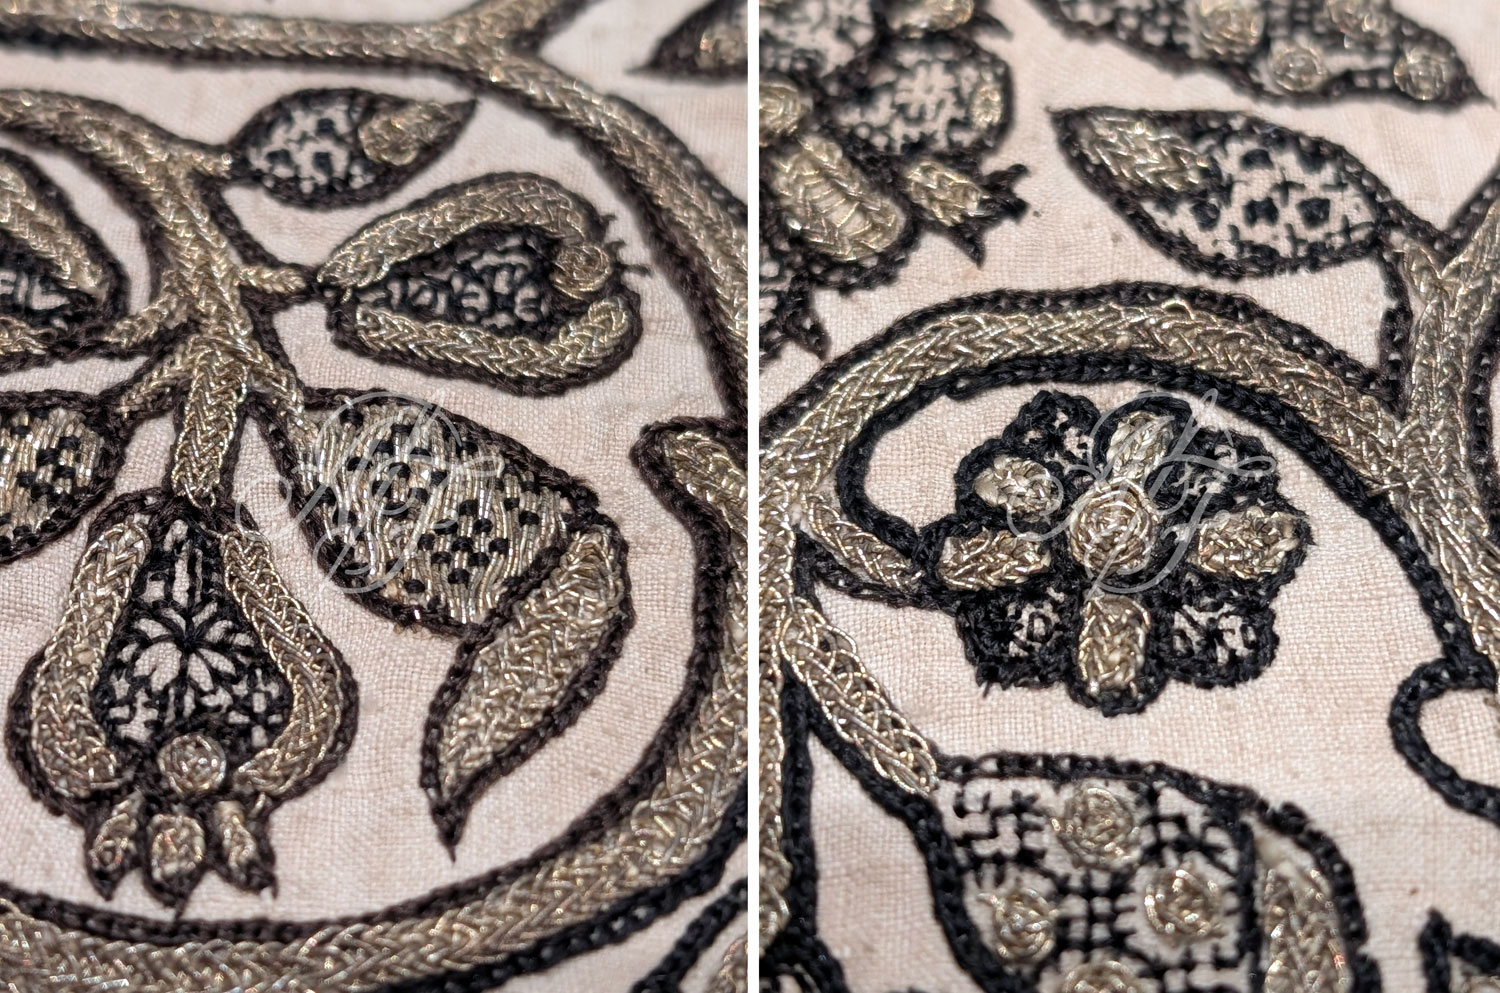
The order of embroidery work is:
- The fill patterns appear to be done first, perhaps after a pounced or inked outline is made, but before the outlines are begun. It's very difficult to tell, as the fill patterns often finish just short of the outlined edges. They're in a variety of geometric designs, seemingly randomly dispersed, including dots and crosses, lattices, and small floral motifs. Some of the finer ones are sewn in a single ply silk, where others (the lattice ones especially) are in the same double ply as the outlines. There is a slight colour variation between the two types of silk threads, as one is more dark brown than true black.
- The chain stitch outlines are completed next to surround the fill patterns. The chains themselves are very, very small indeed, no more than 2mm in width or depth, and these stitches are 1-2mm long on the reverse. The chains are so tight that there's very little open space in the center of each stitch, making them very dark and pronounced.
- The silver-gilt double-braid is added last, and it's been pre-made in long strips that are cut to length and then couched down with horizontal stitches using the same silver-gilt thread. (I found that somewhat surprising that it wasn't gold-tone silk used to couch it down, but this would blend in with the braid better - although it would cost much more to do!) The couching stitches are not visible at all on the exterior, so they might run through the middle of the braid instead of sitting on top? It's very difficult to tell since the couching is done in the same silver-gilt thread. These couching stitches are easily visible on the reverse and they are 3-5mm wide, varying quite a bit in distance and width. At the beginning and end of the braids, the gilt threads are separated and passed through to the reverse of the coif, then knotted with long tails left hanging (15-20mm).
- There are also circular sections of silver-gilt thread that are made separately, and not of the pre-made braid. These are made in a rosette stitch like you would do for crewel work, with a single gilt thread alternately wrapping under and over spokes to create the rosette. There are also a few small sections filled in with satin stitched rows of silver-gilt thread, couched over with black silk thread in a dotted diamond pattern.
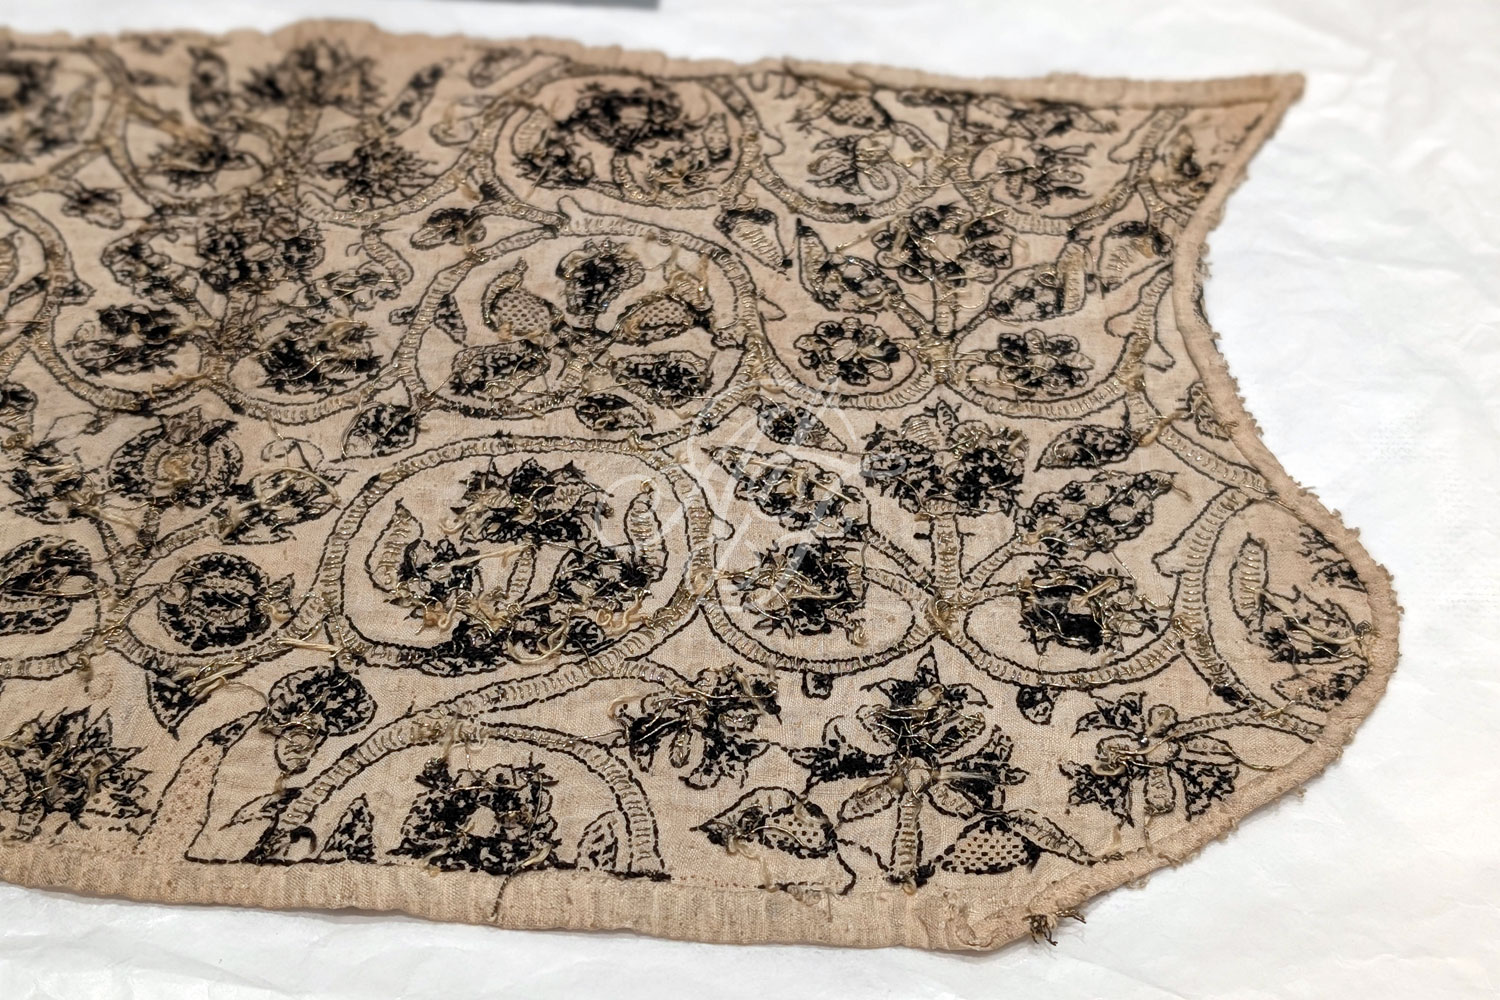
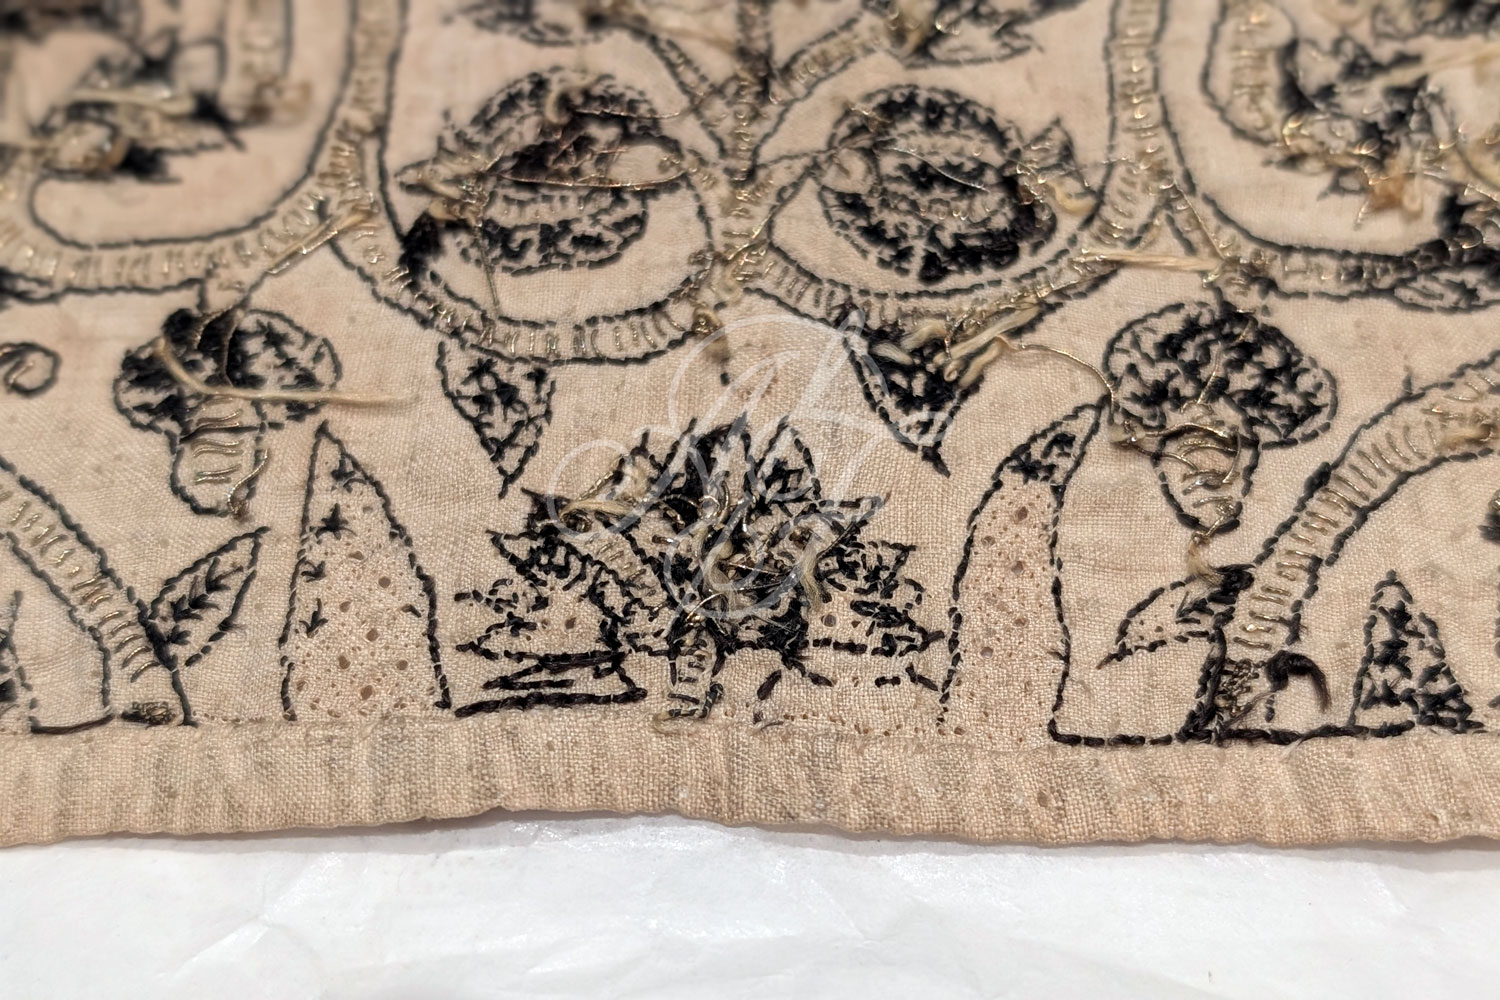
On the reverse of the coif, the stitching is surprisingly messy, particularly in knotting and carried stitches! Isn't that a relief to know sometimes?! Despite some messy knots, the entire piece is in remarkably good condition. Most of the embroidery is intact, and much of the structural stitching remains (even remnants of cut stitches along the previously sewn edges). The silver-gilt thread remains very shiny gold on the reverse especially, but the front of the silver-gilt braid is more dull and silvery. It must have been very shimmery indeed when new! There is some missing embroidery stitching at the nape, but the stitch holes remain. I wonder if this is due to it being a high-wear area, perhaps rubbing against a collar or ruff and damaging the embroidery at that area?
Coif and Forehead Cloth
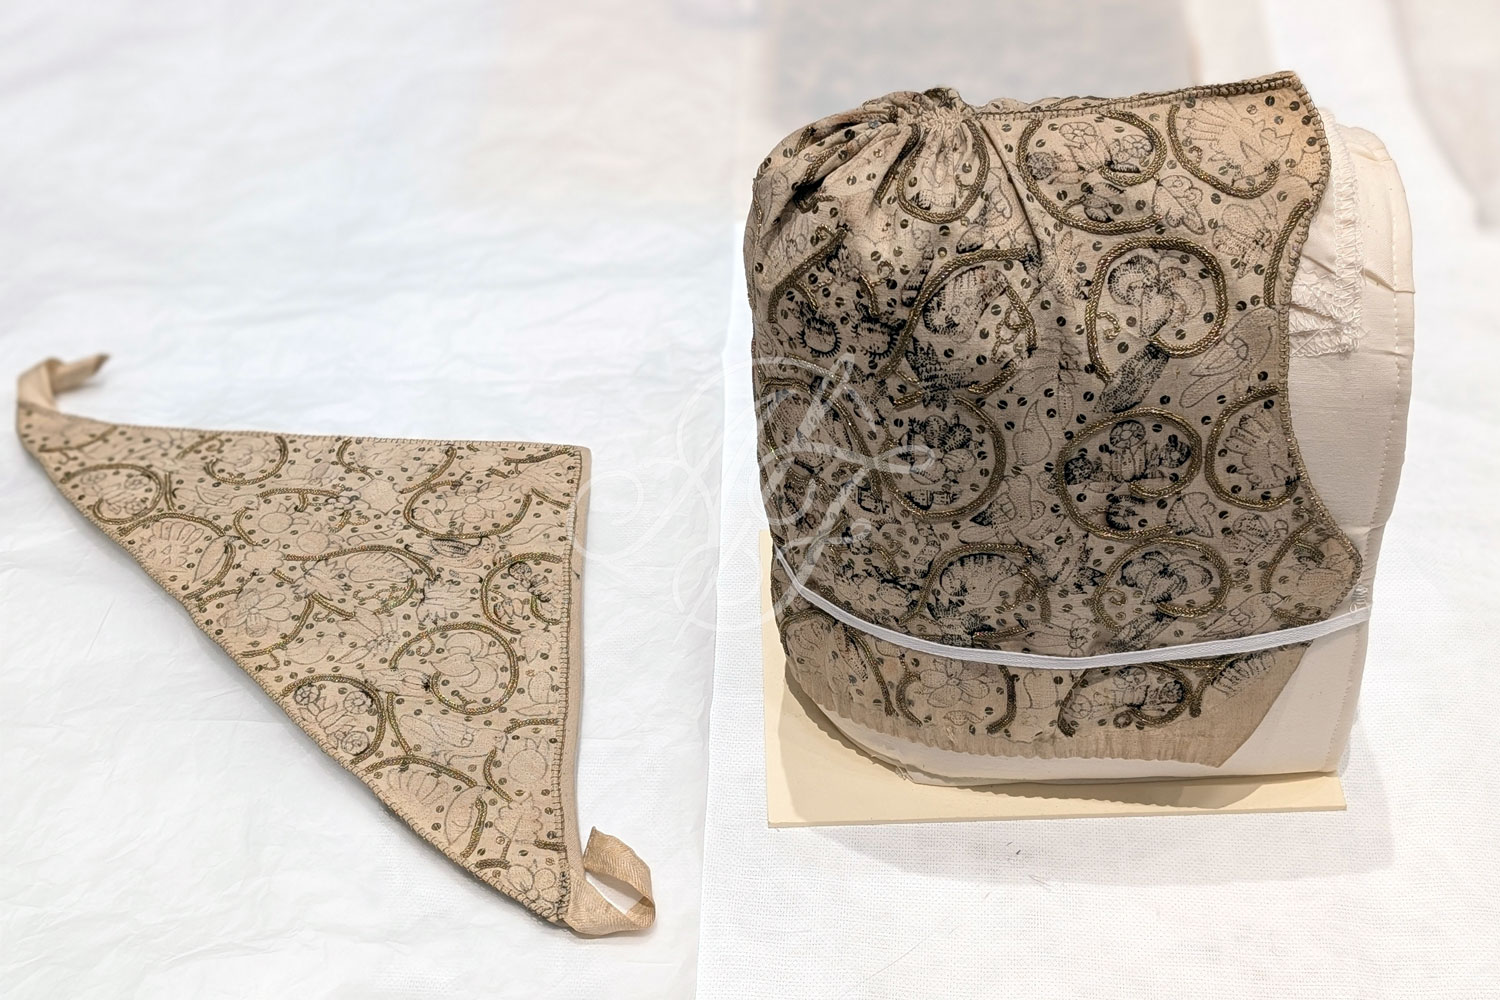
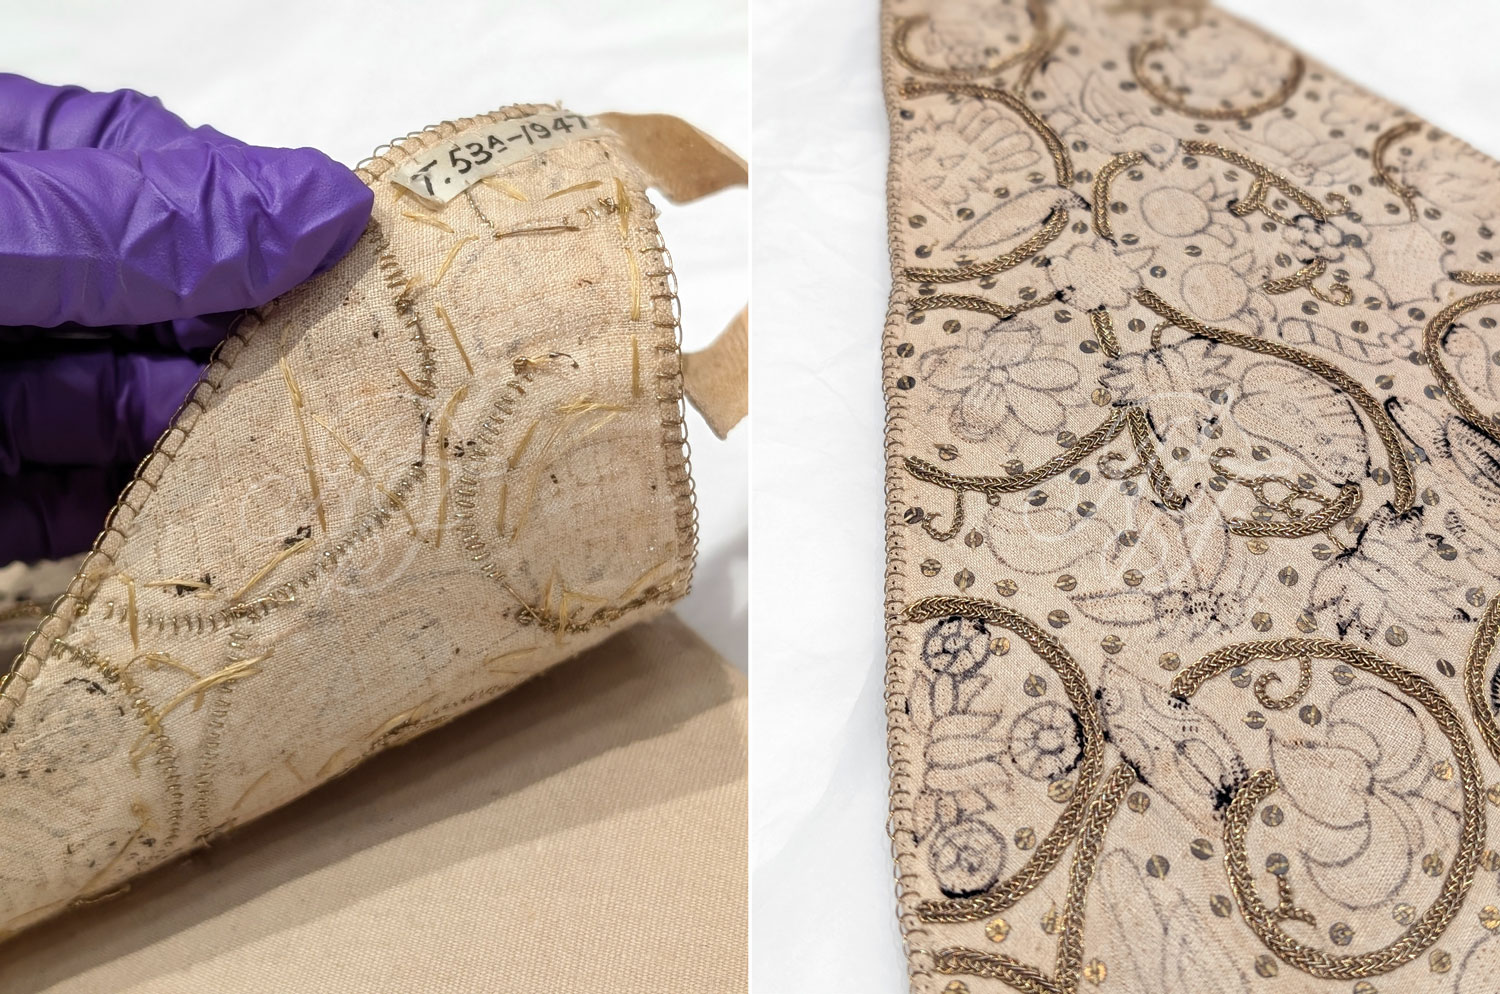
This is a 2-part item, including both the coif and the matching forehead cloth. It's rare to have both pieces remaining together like this! First, details from the V&A Museum's records: Accession number T.53&A-1947. Circa 1600-1650, English. (I suspect it's nearer to 1600-1625, but this is the information they've provided). The description on the online listing reads: "The pattern consists of silver-gilt scrolling stems bearing holly leaves, pansies, oak leaves, thistles, pea pods, strawberries, birds, caterpillars and flying insects in black silk."
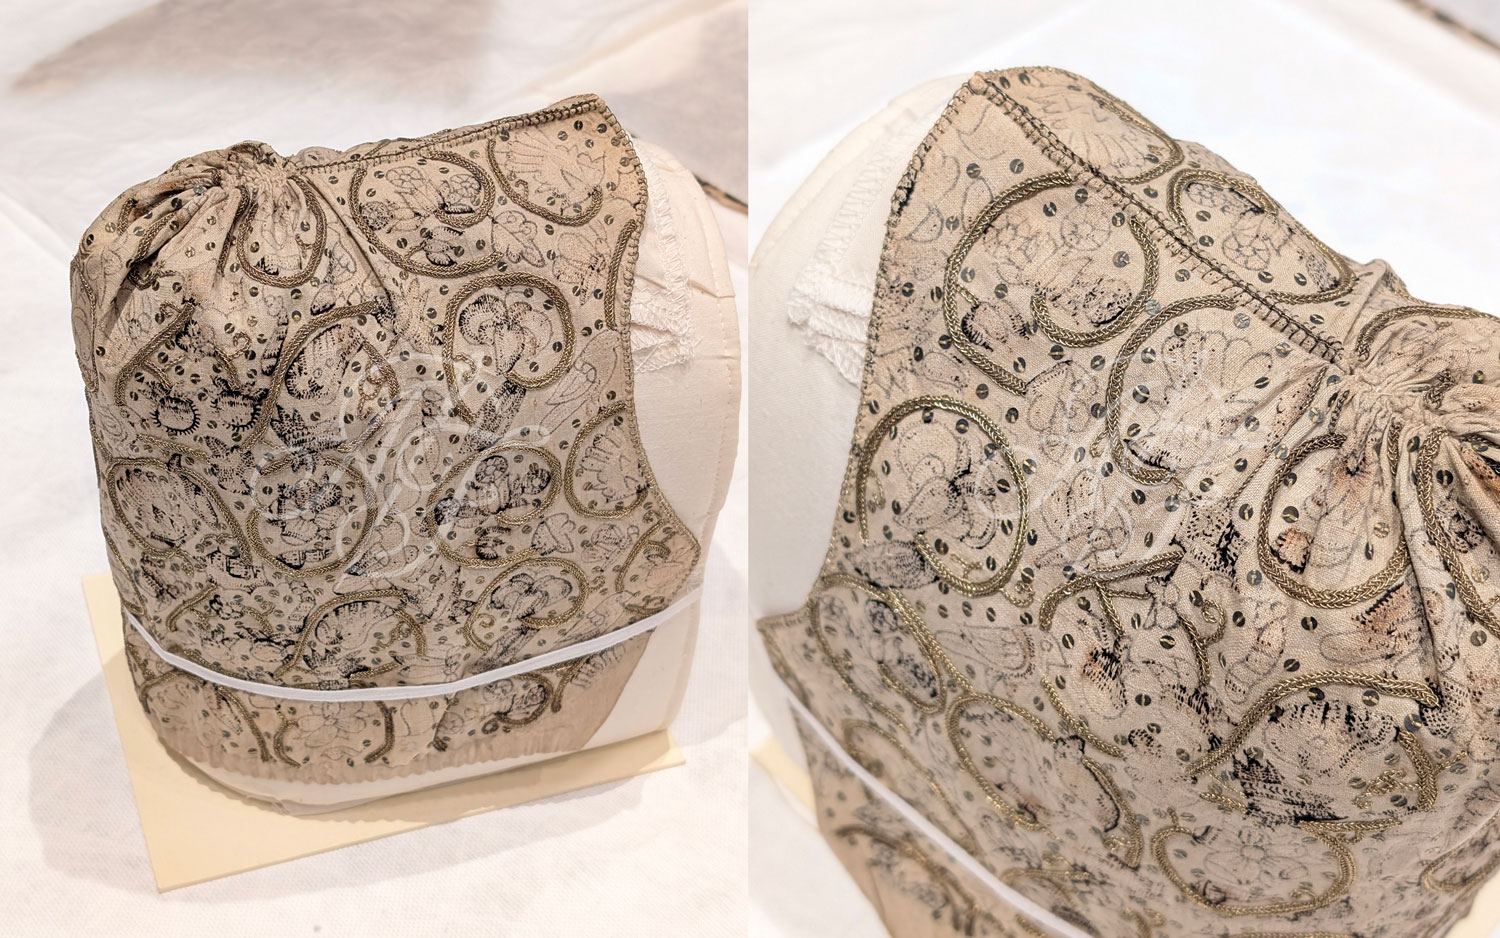
This coif is made of heavier linen than some of the others and fully opaque, with about 60 threads per inch and overall quite stiff to the touch. The bottom casing is 10mm folded under. Most of the front edge along the forehead and cheeks is folded back about 4mm and whipped under, but as you get to the bottom edge where it meets the bottom nape casing, a wider portion is turned back so that the cheek edge is a folded edge. Unfortunately, this is not fully visible due to the way it's mounted, but it folds back perhaps 30mm at the bottom edge? This gives a clean folded edge at the bottom of the ears and covers the reverse of the embroidery at the front, which is rather annoying for research because I was unable to view most of the reverse of the embroidery. Ah well! Most of the front edge is button hole stitched (about 3-4mm) over with silver-gilt thread. The button hole stitches also run across the top of the coif, and these were done before the top of the head seam was sewn with linen thread (whip stitched). This silver-gilt buttonhole stitching continues across the top of the head to the point of the pleats at the top back of the crown.
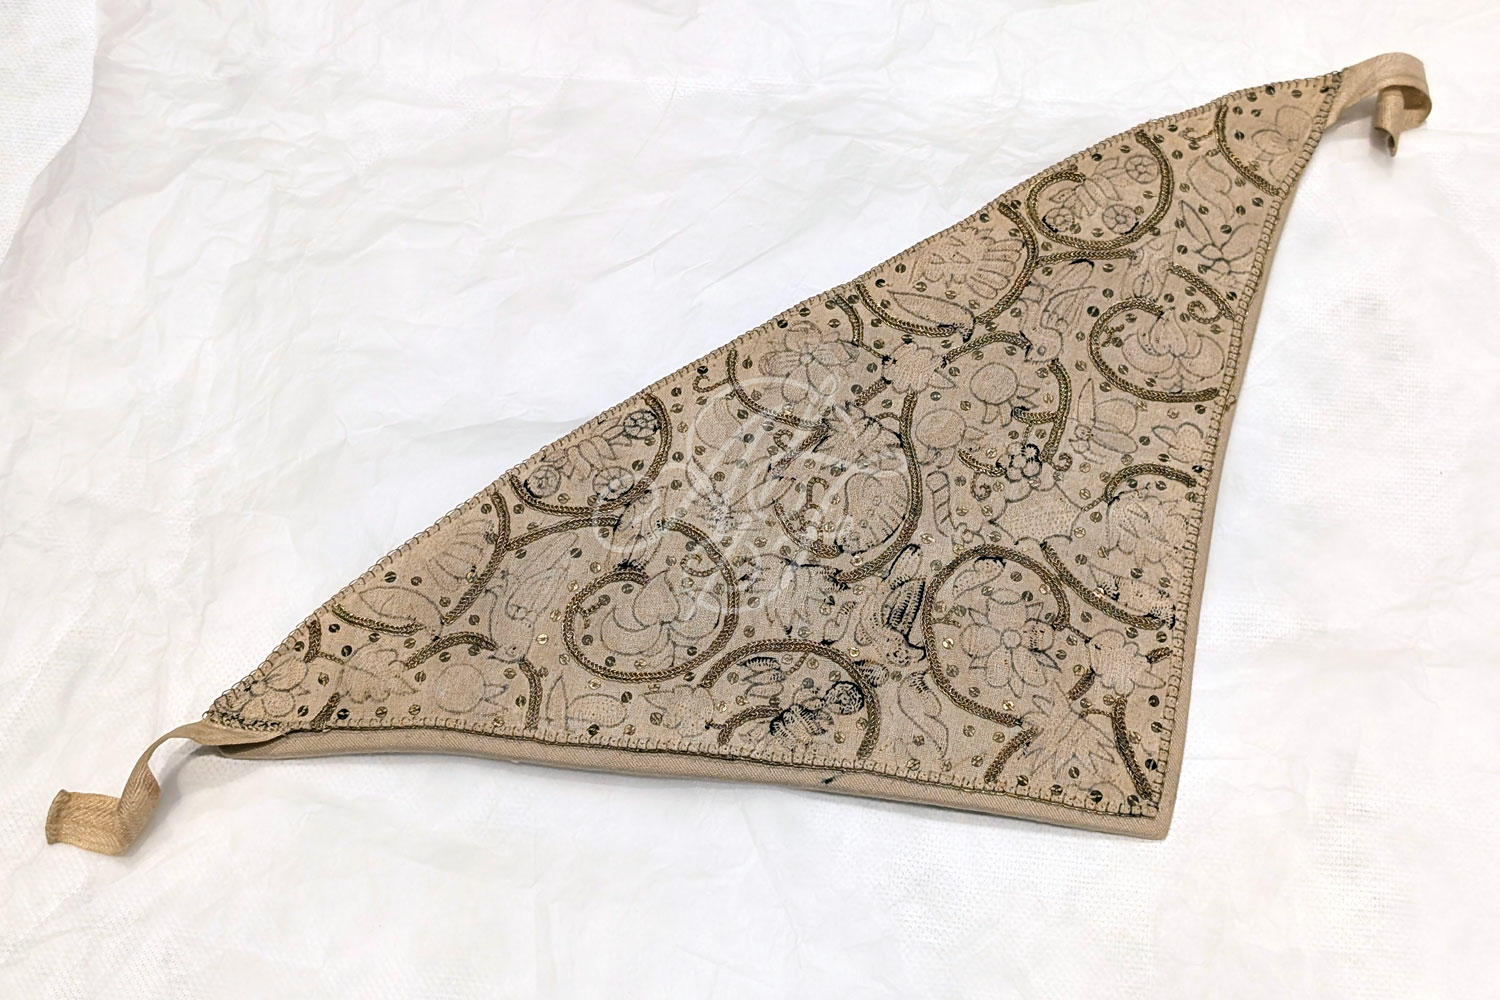
The matching forehead cloth is also partially mounted, so I was unable to see the entire back or manipulate it very much, but I was permitted by staff to turn up a corner to look at part of the reverse. The shorter edges are cut on the straight and cross grain, with the long edge on the true bias. (This is the same as all other forehead cloths I have seen - Someone please let me know if you know of any differing examples!) The design is a perfect match to the coif, also with buttonhole stitching in silver-gilt thread along all 3 sides of the triangular shape. It still has its original twill linen tapes on 2 corners (an exciting rarity!). They are quite short, evidence that they would have been pinned together and not tied, each about 14mm wide and 7.5cm long with a 3mm hem turned under on the ends. The twill tapes are whip stitched into place over the cloth's 2mm wide baby hemmed edges, and very neatly sewn with linen thread.
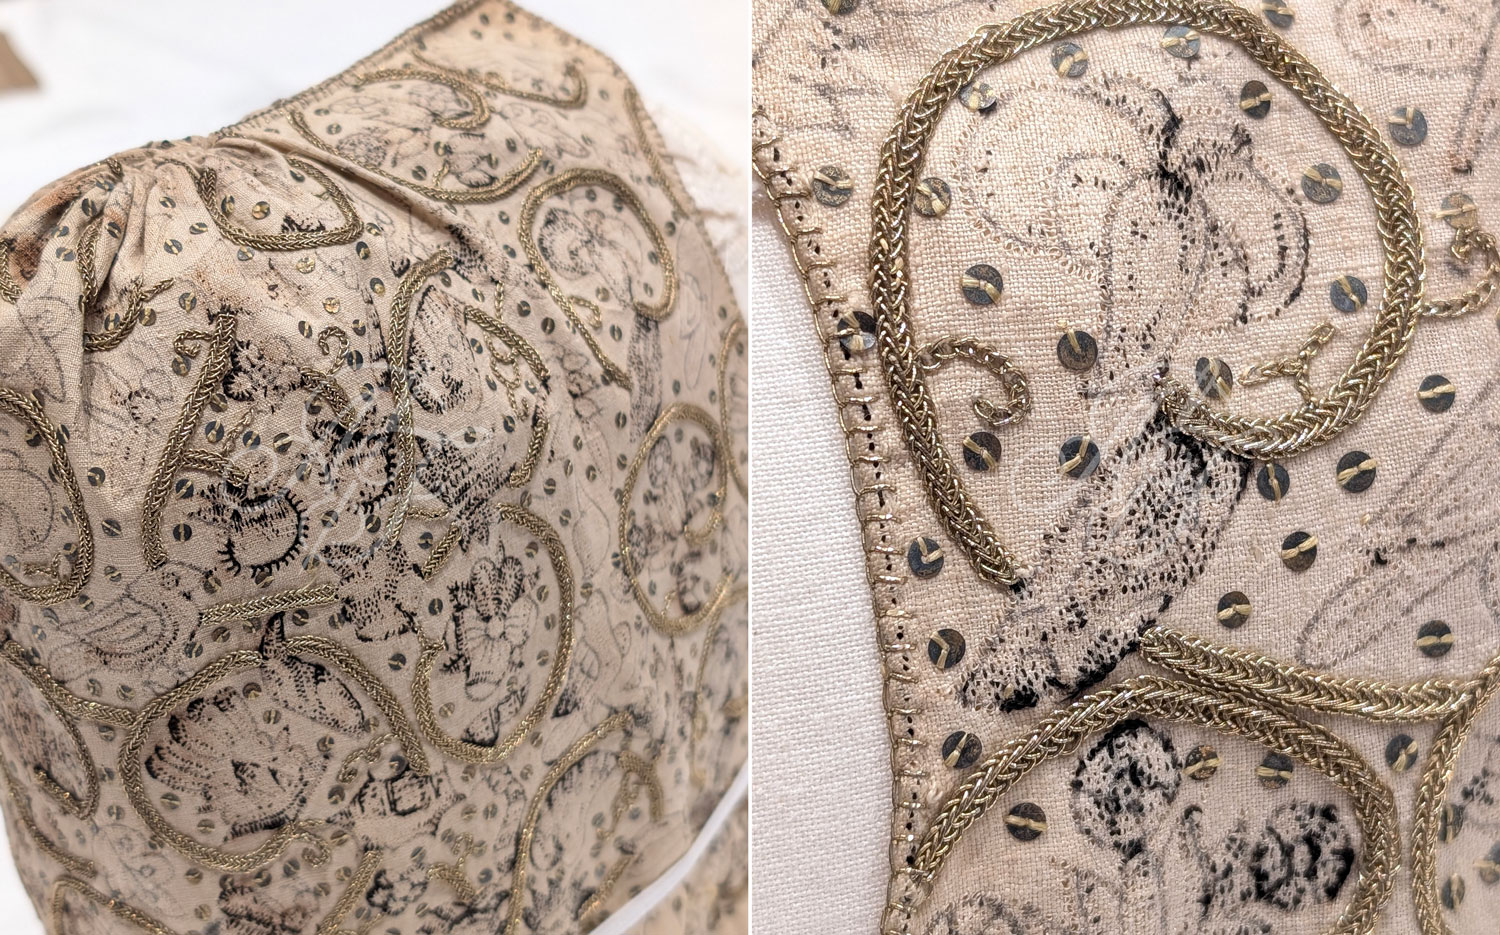
Onto the actual embroidery! Unfortunately, much of the blackwork has disintegrated away, which I have learned is often due to chemical reactions within the dyes used on the silk, causing it to destabilize and disintegrate. But at least the stitch holes remain highly visible, showing clearly the buttonhole stitches used as outlining on motifs, and very neat, consistent rows of fill-in running stitches. These fill-in stitches are 1-1.5mm long and the buttonhole stitches are 2-3mm in a double ply silk. The visible marked pattern underneath is in dark ink and remains completely visible everywhere the embroidery has disintegrated, so it would be possible to accurately reproduce the design if anyone were up for a good project!
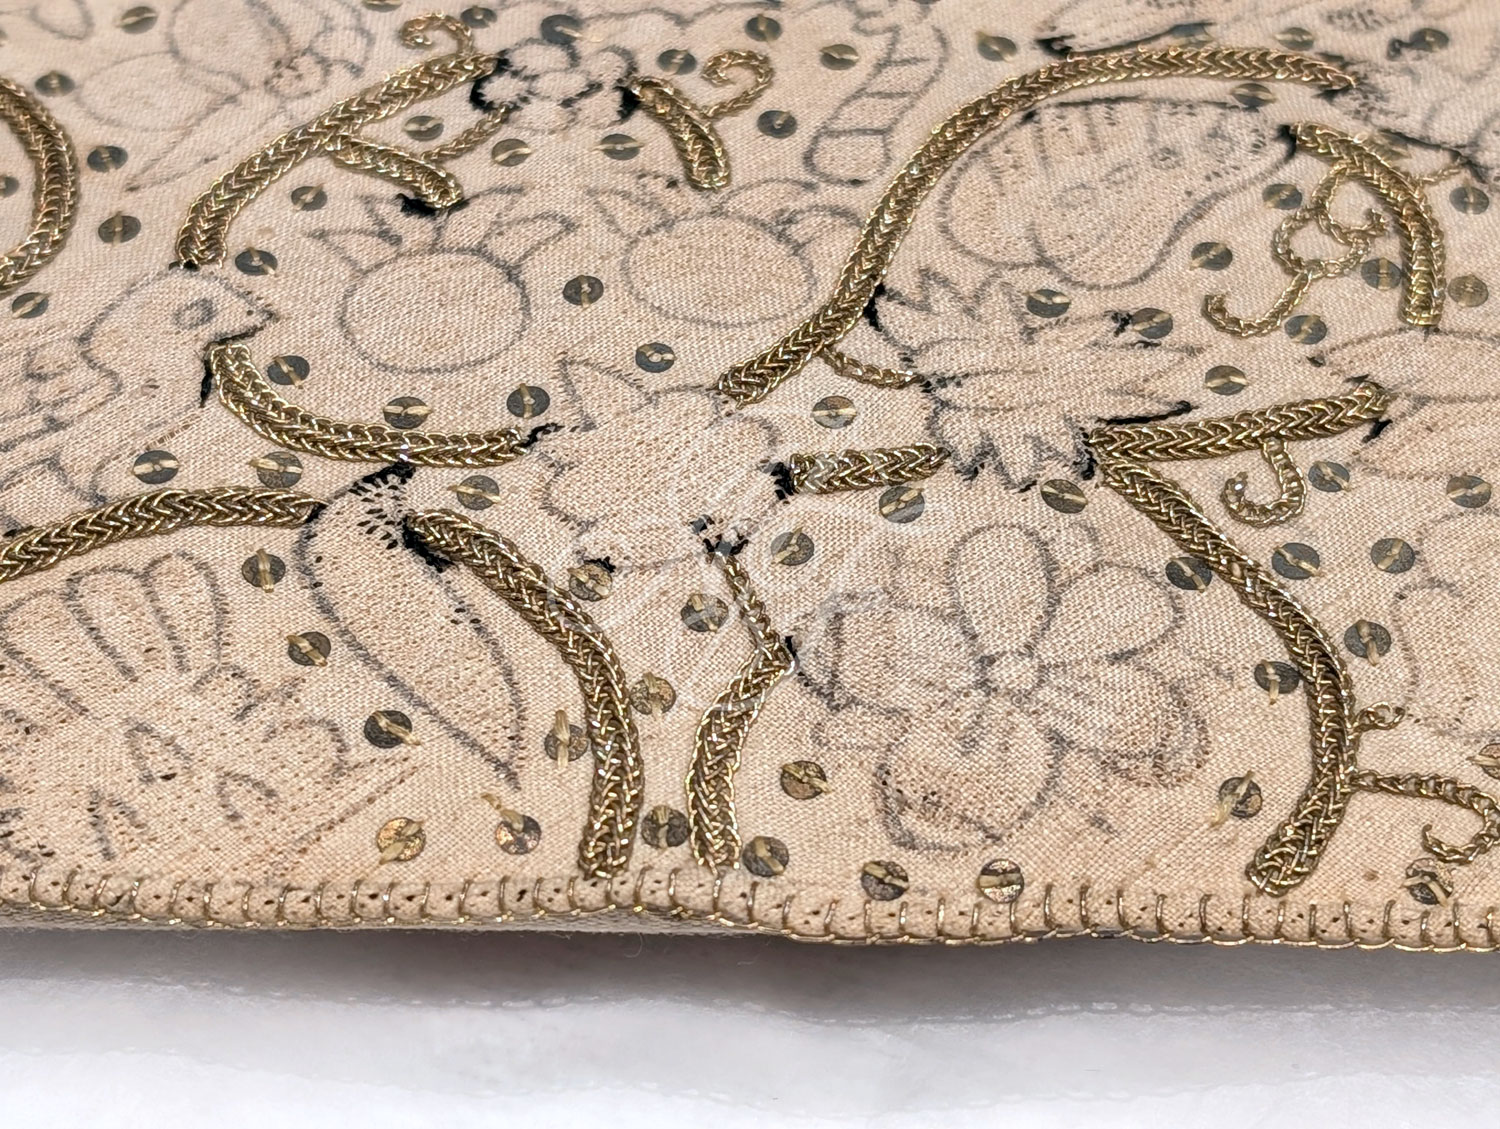
The silver-gilt braid is done in a double braid, very neatly applied. The ends of the braid are separated into strands and worked into the linen to secure on the reverse, and I can just barely see the horizontal couching stitches on the edge of the reverse side of the linen. These couching stitches are done with yellow silk and not silver-gilt thread like the previous example. It also features single chain stitches in silver-gilt thread sewn directly into the linen. Last, there are lovely 3-4mm spangles attached, mostly with 2 (sometimes 3) stitches, with yellow silk thread. Interestingly, these are not knotted between each spangle as I would do myself, and they are all strung together with long carry threads between. These are applied last.
Unfinished Cap
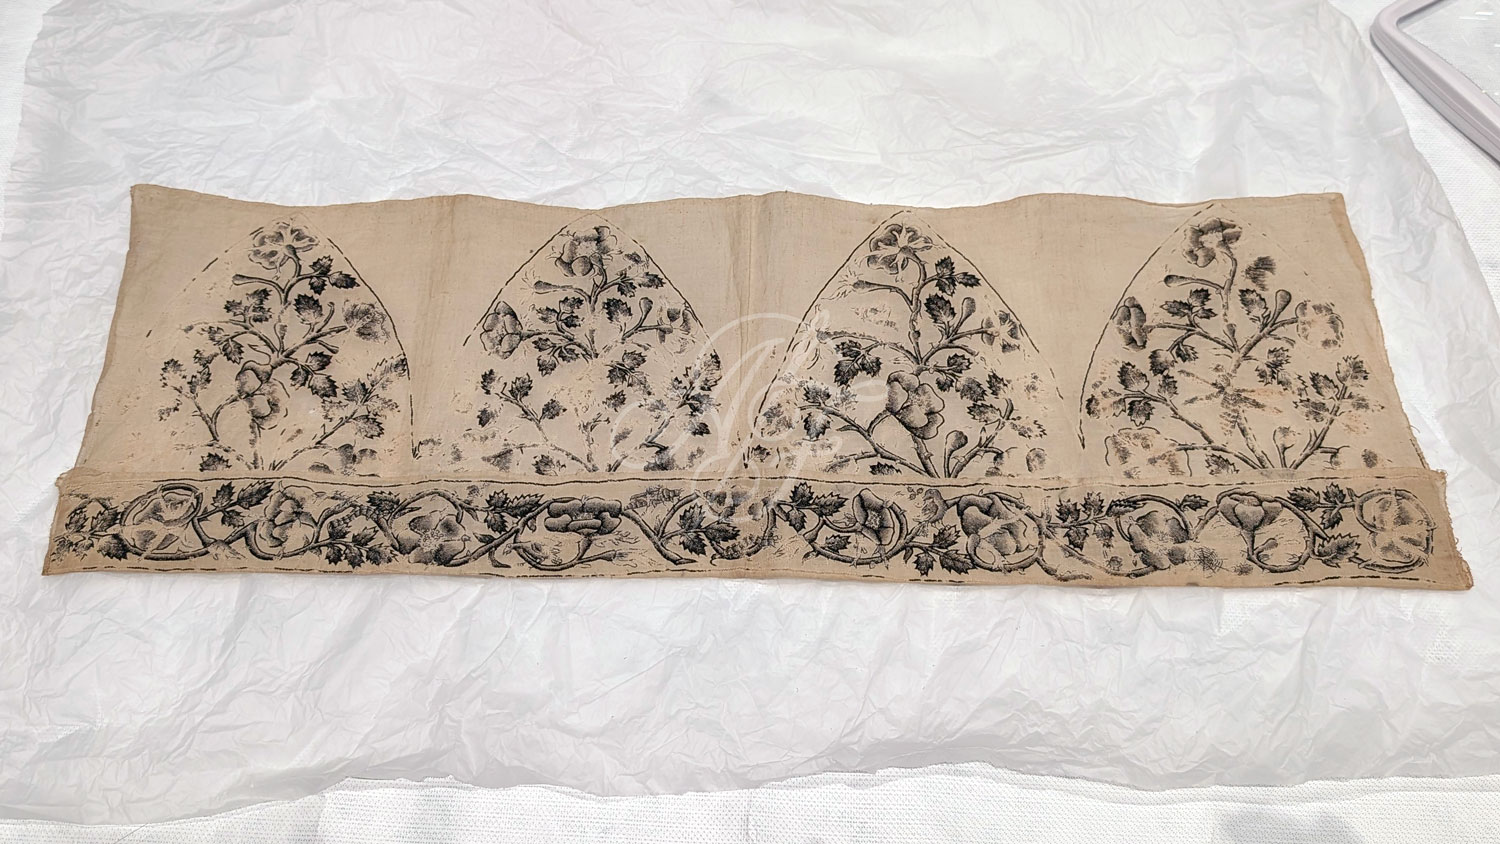
Details from the V&A Museum's records: accession number T.9-1950. This item is circa 1600, and the only men's item I've studied for this project.
I may have saved the best for last! Honestly, I wasn't overly fussed for this piece when I looked at online photos, but my jaw hit the floor when I saw it in person. If any of you are planning a V&A visit to study objects, I beg you to please add this one to your list even if it doesn't particularly relate to your study subject. It is, hands down, the finest example of embroidery I have seen in any museum in my entire life. Even that is probably an understatement, and I'm sure my photographs also will not do it justice. You simply must see the stitching to believe it.
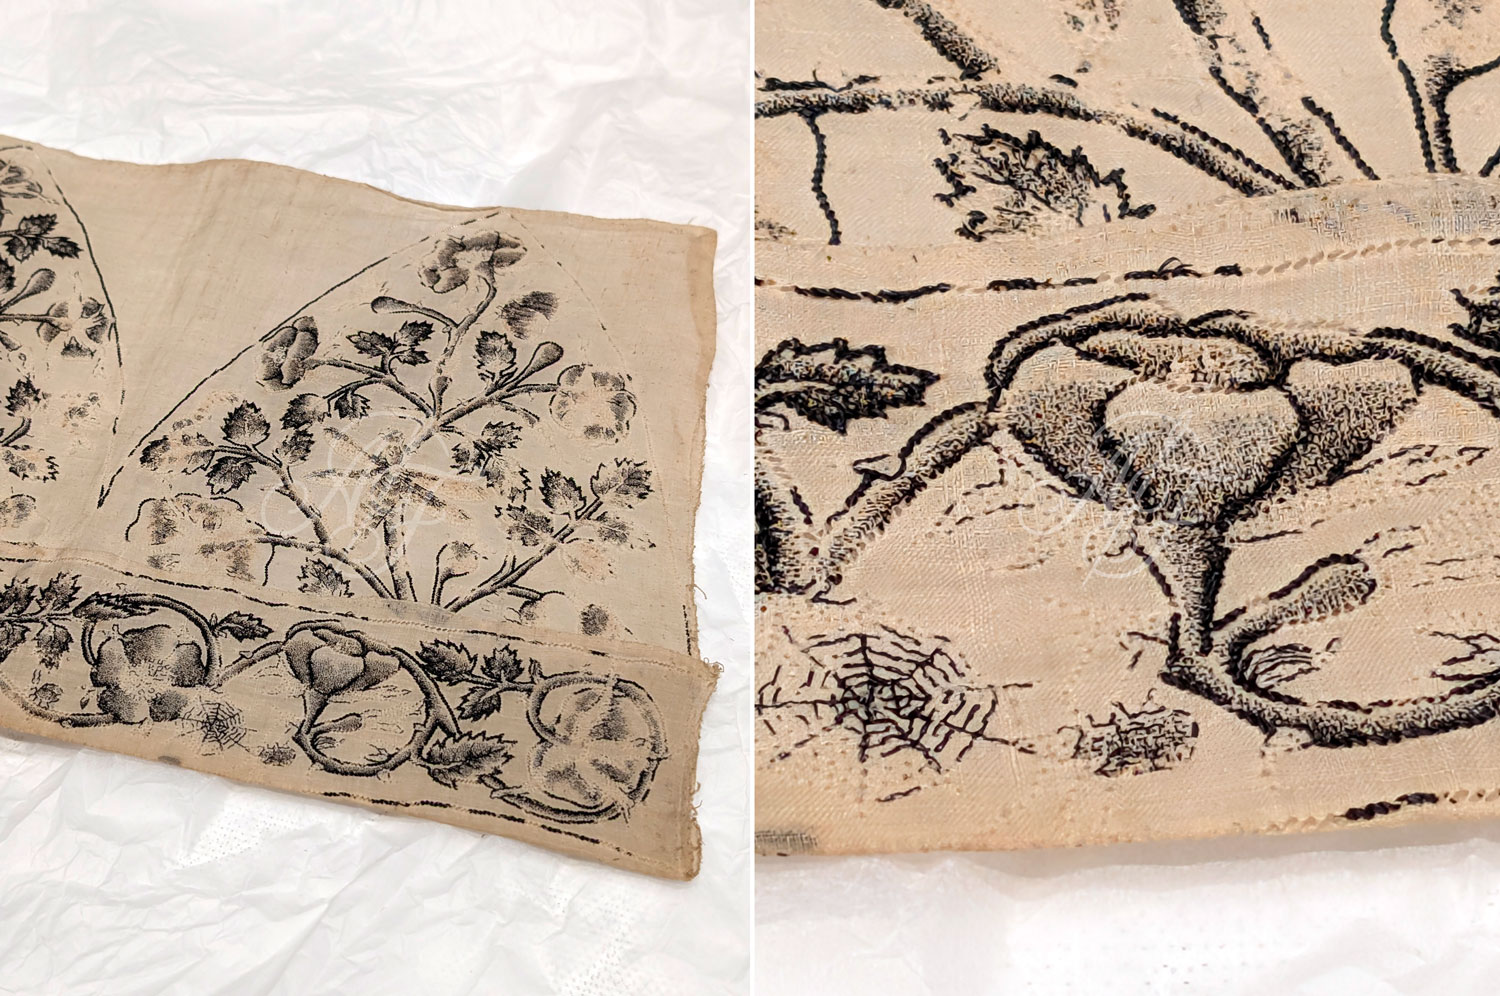
The fineness of both linen and embroidery is, frankly, astonishing. My eyes aren't good enough to count the threads per inch, even with a well-lit magnifying glass, but it looks to be around 110. (!) The linen is also beautifully sheer, not through wear and tear or disintegration, but with absolute fineness and a near-perfectly even weave. It looks almost like a modern organdy, and it's hard to fathom how such fine threads could be spun and woven entirely by hand - and that's before we even get to the needlework! Under the folded-up brim is a seam that is beautiful sewn with a finish no more than 2mm wide.
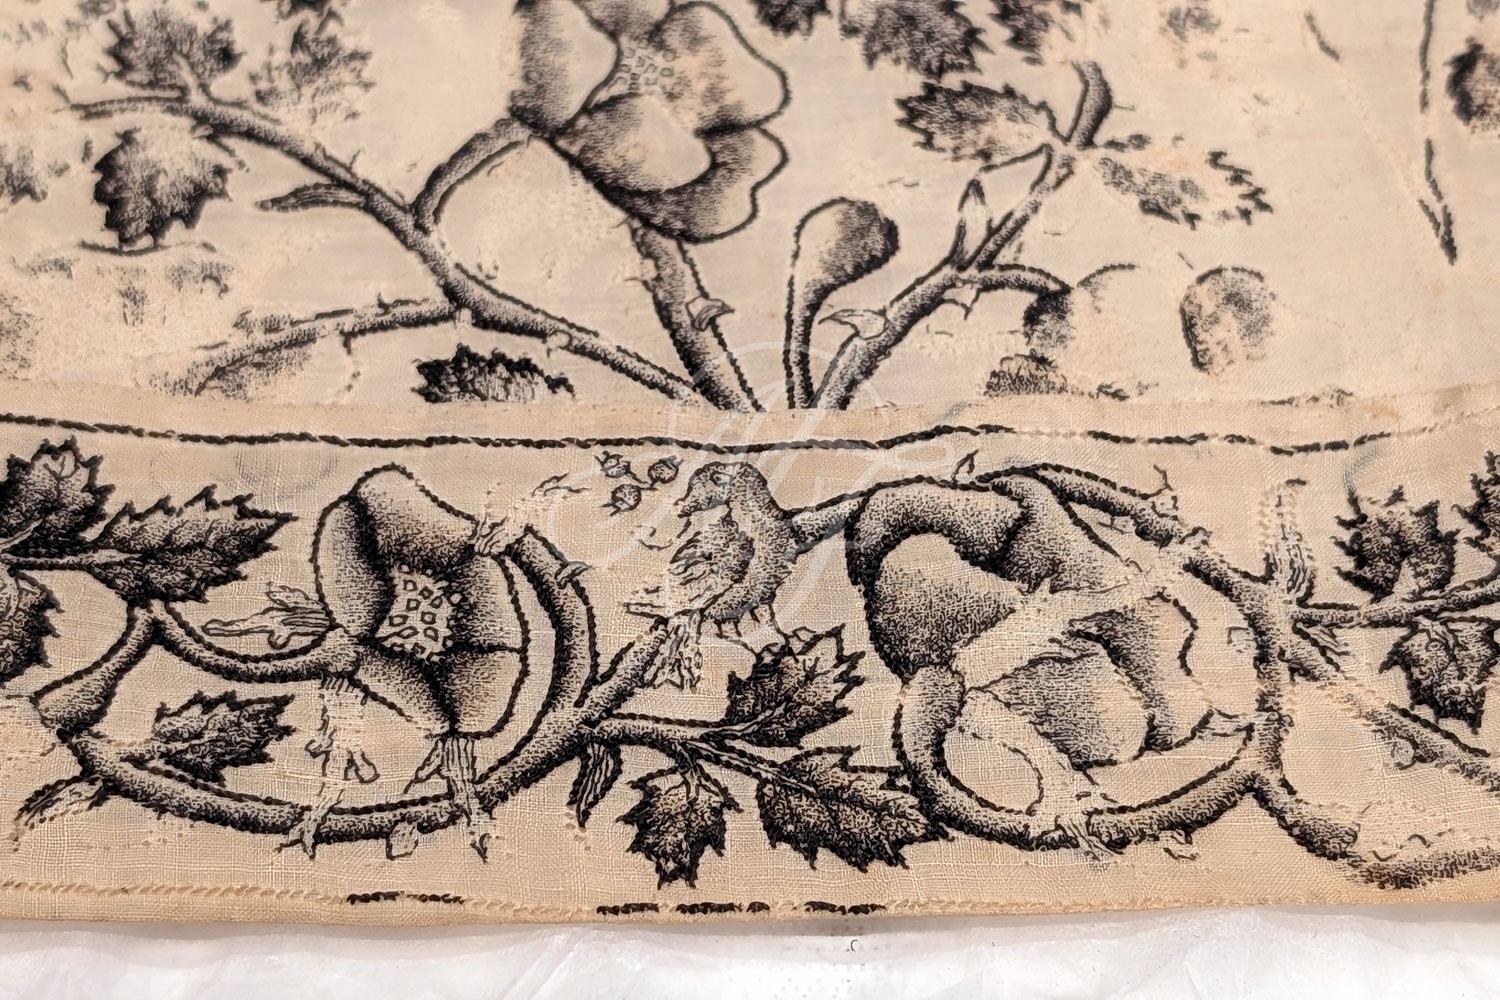
As for the embroidery, the largest stitches I could find are 1mm long, and the vast majority of stitches are a small fraction of a millimeter, with the shading stitches each the length of a single thread of the 110 thread per inch linen (that's less than 1/4 of a millimeter, folks!). Without a magnifying glass, the shading looks more like charcoal smudging than stitching. I have truly never seen any sewing this fine or detailed in my life... And to imagine that it was done without concentrated artificial light! Magnifying lenses existed as early as the 13th century, but they weren't as good as modern ones, and it's hard to know how widespread their use would have been amongst tailors or embroiderers. So I think we must consider that this was likely done with the naked eye. Astonishing.
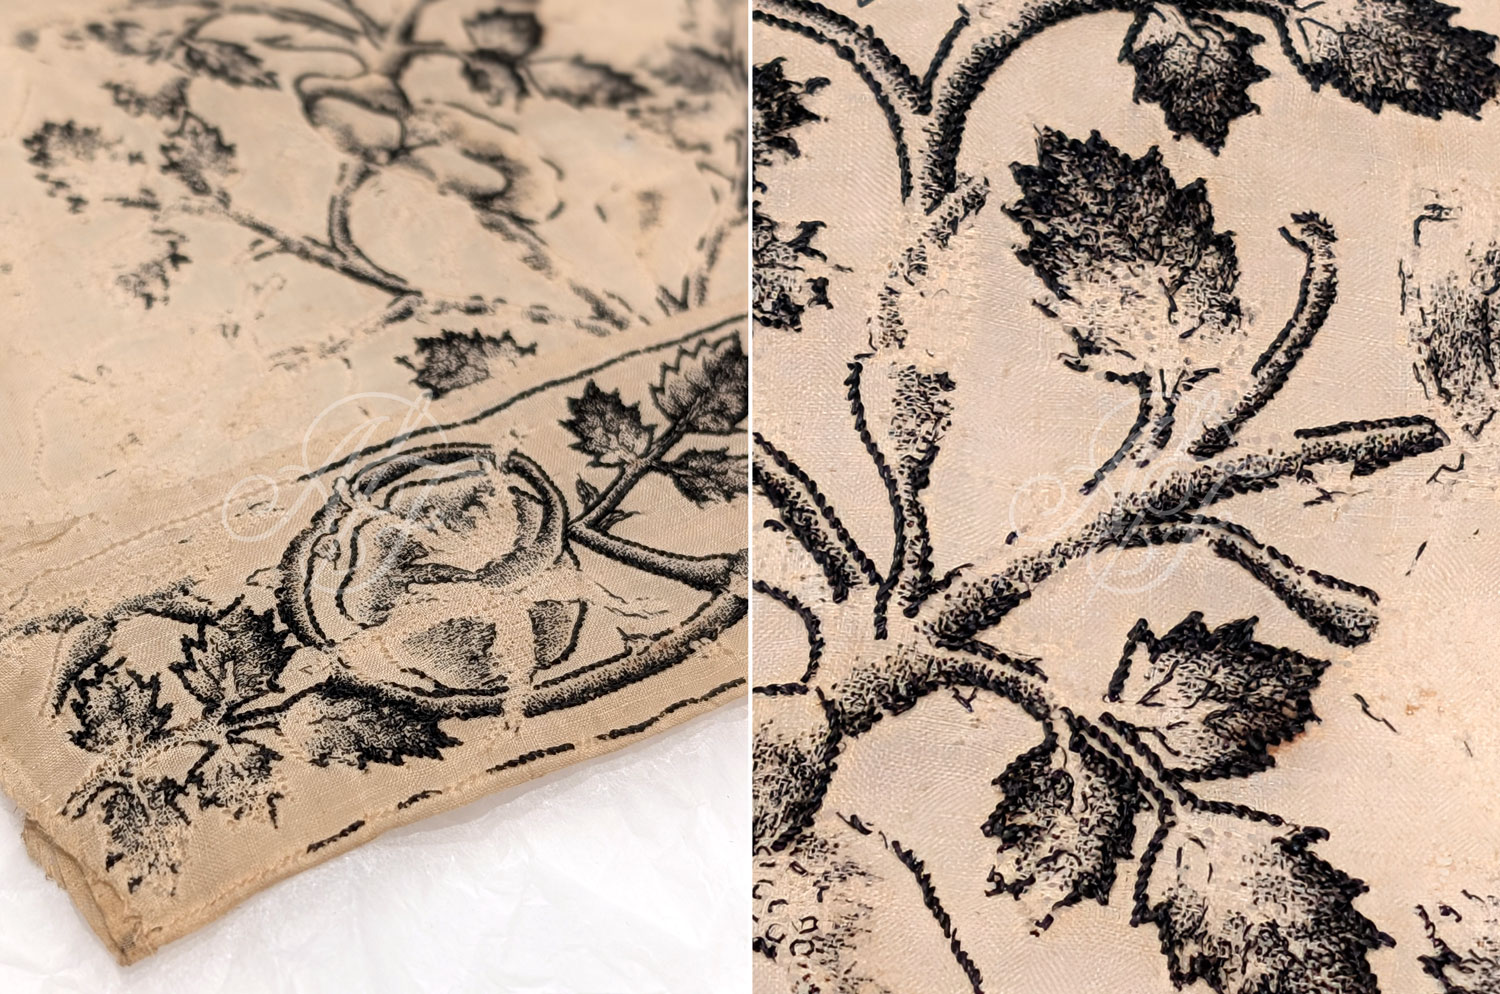
Around the motifs, the stem stitch outlines are sewn in a 2 or 3 ply (but very fine) black silk, with the stitches around 1mm long and very regular and consistent. This is clearly the work of a trained professional. I cannot imagine any amateur or part-time needleworker creating such consistently fine work. The outlines are completed first and then followed with these insanely tiny seed stitch and running stitch shading details. (As mentioned before, each of these stitches is about 1/4 of a millimeter in length.) I could hardly see the individual stitches with the naked eye, and it required a lighted magnifying glass to differentiate the individual stitches from one another. They're done in a very thin single filament of black silk, far finer than any other silk I've seen, and in some places on the reverse, these patches are completely black with stitching and overstitching. Even so, no knots are visible anywhere and the back is very professional and tidy, despite the amount of stitching.
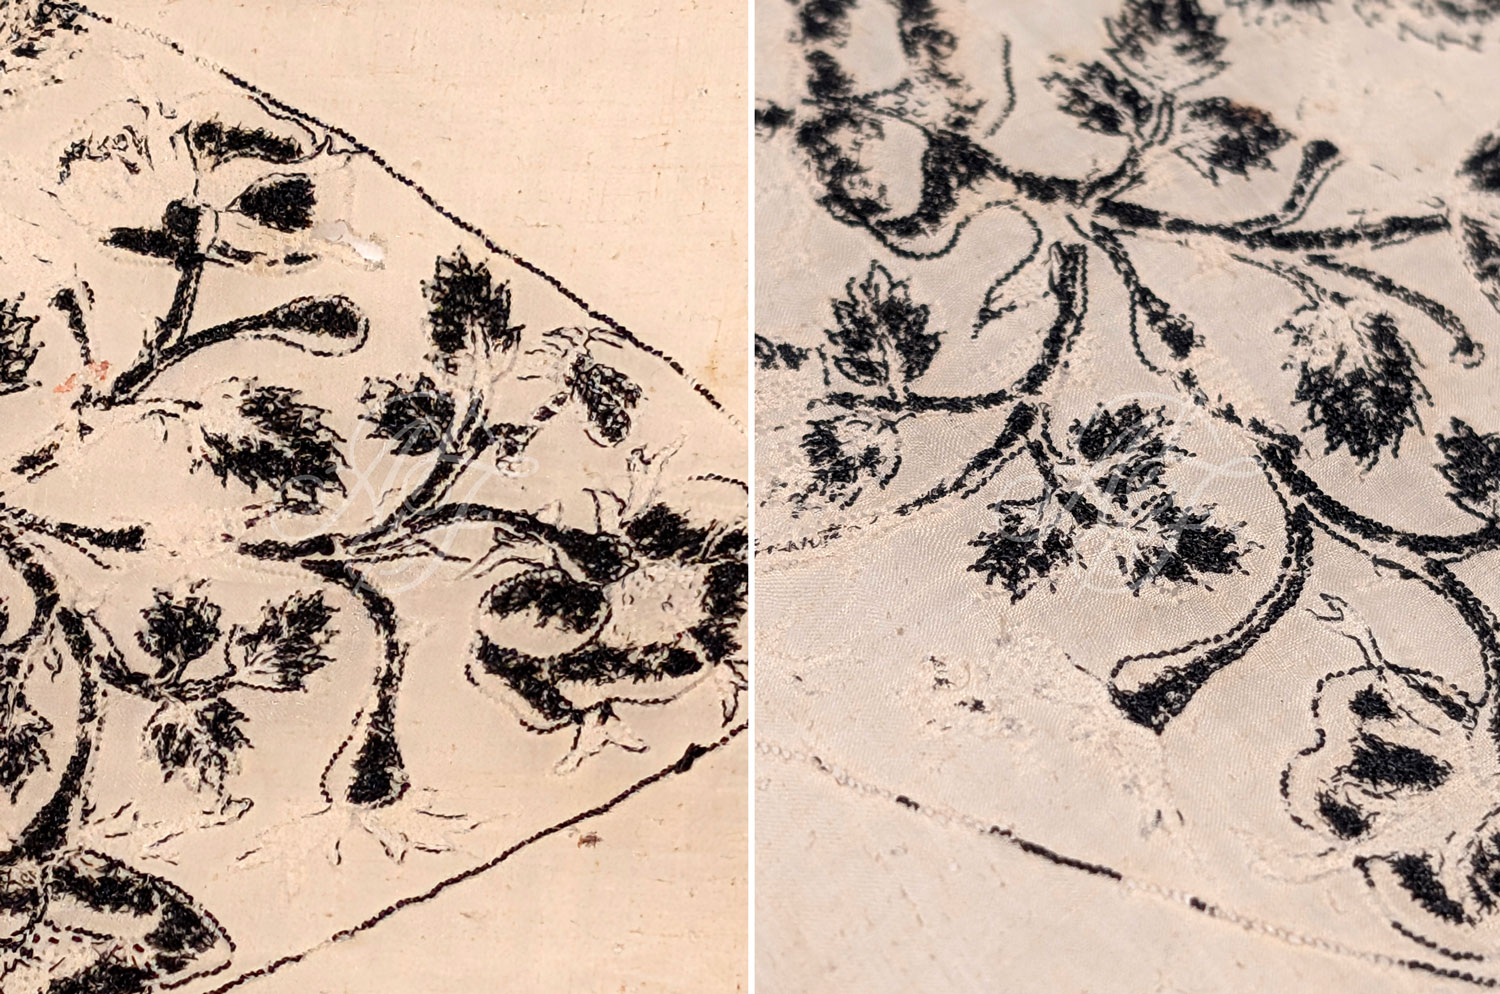
It's both a blessing and a shame this piece was never completed! It would have made an incredible cap if sewn up, although I suspect it wouldn't have survived to 2026 if it were ever worn and used. Perhaps then, we can thank whoever or whatever caused this work to be left unfinished for the ability to study it today! I still can hardly believe I saw it with my own eyes and touched it with my own (gloved) hands.